#installing openshift pipelines
Explore tagged Tumblr posts
Visit Tumblr Blog
Explore Tumblr blogs with no restrictions, modern design and the best experience.
Last Seen Tumblr Blogs


Fun Fact
Women make up for the other 50% of Tumblr’s audience.
Text
Enterprise Kubernetes Storage with Red Hat OpenShift Data Foundation (DO370)
In the era of cloud-native transformation, data is the fuel powering everything from mission-critical enterprise apps to real-time analytics platforms. However, as Kubernetes adoption grows, many organizations face a new set of challenges: how to manage persistent storage efficiently, reliably, and securely across distributed environments.
To solve this, Red Hat OpenShift Data Foundation (ODF) emerges as a powerful solution — and the DO370 training course is designed to equip professionals with the skills to deploy and manage this enterprise-grade storage platform.
🔍 What is Red Hat OpenShift Data Foundation?
OpenShift Data Foundation is an integrated, software-defined storage solution that delivers scalable, resilient, and cloud-native storage for Kubernetes workloads. Built on Ceph and Rook, ODF supports block, file, and object storage within OpenShift, making it an ideal choice for stateful applications like databases, CI/CD systems, AI/ML pipelines, and analytics engines.
🎯 Why Learn DO370?
The DO370: Red Hat OpenShift Data Foundation course is specifically designed for storage administrators, infrastructure architects, and OpenShift professionals who want to:
✅ Deploy ODF on OpenShift clusters using best practices.
✅ Understand the architecture and internal components of Ceph-based storage.
✅ Manage persistent volumes (PVs), storage classes, and dynamic provisioning.
✅ Monitor, scale, and secure Kubernetes storage environments.
✅ Troubleshoot common storage-related issues in production.
🛠️ Key Features of ODF for Enterprise Workloads
1. Unified Storage (Block, File, Object)
Eliminate silos with a single platform that supports diverse workloads.
2. High Availability & Resilience
ODF is designed for fault tolerance and self-healing, ensuring business continuity.
3. Integrated with OpenShift
Full integration with the OpenShift Console, Operators, and CLI for seamless Day 1 and Day 2 operations.
4. Dynamic Provisioning
Simplifies persistent storage allocation, reducing manual intervention.
5. Multi-Cloud & Hybrid Cloud Ready
Store and manage data across on-prem, public cloud, and edge environments.
📘 What You Will Learn in DO370
Installing and configuring ODF in an OpenShift environment.
Creating and managing storage resources using the OpenShift Console and CLI.
Implementing security and encryption for data at rest.
Monitoring ODF health with Prometheus and Grafana.
Scaling the storage cluster to meet growing demands.
🧠 Real-World Use Cases
Databases: PostgreSQL, MySQL, MongoDB with persistent volumes.
CI/CD: Jenkins with persistent pipelines and storage for artifacts.
AI/ML: Store and manage large datasets for training models.
Kafka & Logging: High-throughput storage for real-time data ingestion.
👨🏫 Who Should Enroll?
This course is ideal for:
Storage Administrators
Kubernetes Engineers
DevOps & SRE teams
Enterprise Architects
OpenShift Administrators aiming to become RHCA in Infrastructure or OpenShift
🚀 Takeaway
If you’re serious about building resilient, performant, and scalable storage for your Kubernetes applications, DO370 is the must-have training. With ODF becoming a core component of modern OpenShift deployments, understanding it deeply positions you as a valuable asset in any hybrid cloud team.
🧭 Ready to transform your Kubernetes storage strategy? Enroll in DO370 and master Red Hat OpenShift Data Foundation today with HawkStack Technologies – your trusted Red Hat Certified Training Partner. For more details www.hawkstack.com
0 notes
Text
Red Hat OpenShift vs. Red Hat Ansible: Which Course Is Best for You?
In the world of enterprise IT solutions, two of Red Hat’s most popular offerings are OpenShift and Ansible. Both tools serve unique purposes in the automation and orchestration space, with Red Hat OpenShift focusing on container orchestration and application management, and Red Hat Ansible automating IT tasks such as configuration management and software deployment.
When deciding between a Red Hat OpenShift or Red Hat Ansible course, it's essential to understand the differences in their functionalities, use cases, and the skills they offer. This blog will guide you through the key features of both tools and help you choose the best course based on your career goals and organizational needs.
What is Red Hat OpenShift?
Red Hat OpenShift is a Kubernetes-based platform designed to manage and deploy containerized applications in a cloud-native environment. It provides an integrated environment for developers and operators to build, deploy, and scale applications efficiently. OpenShift offers powerful features like automated installation, scaling, monitoring, and troubleshooting, which make it a preferred choice for enterprises looking to modernize their IT infrastructure.
Key Benefits of Red Hat OpenShift:
Container Orchestration: OpenShift builds on Kubernetes to manage containerized applications, ensuring automatic deployment, scaling, and operations.
DevOps Integration: OpenShift supports DevOps pipelines, making it easier to manage the entire application lifecycle from development to production.
Hybrid and Multi-Cloud Support: OpenShift allows businesses to run applications seamlessly across hybrid and multi-cloud environments.
Developer-Focused: With built-in CI/CD pipelines and automated workflows, OpenShift is well-suited for developers focusing on cloud-native app development.
What is Red Hat Ansible?
Red Hat Ansible is an open-source automation platform designed to automate IT processes, including configuration management, application deployment, and orchestration. It simplifies the management of complex IT environments, allowing systems administrators to focus on high-level tasks while automating repetitive processes.
Key Benefits of Red Hat Ansible:
Simple Automation: Ansible uses simple, human-readable YAML files (called playbooks) to define automation tasks, making it accessible for both developers and system administrators.
Configuration Management: With Ansible, you can ensure that your infrastructure is configured correctly and consistently across all systems.
Scalability: Ansible can automate processes on a large scale, enabling you to manage thousands of systems with minimal effort.
Agentless Architecture: Ansible operates over SSH and does not require an agent to be installed on the managed systems, reducing overhead.
Comparing Red Hat OpenShift and Red Hat Ansible
While both tools are designed to improve efficiency and reduce manual work, they are used for different purposes. Here’s a breakdown of their core differences:
1. Purpose and Use Cases
OpenShift is primarily for developers and DevOps teams focusing on the management and deployment of containerized applications. If you’re working on a cloud-native application, OpenShift is an ideal tool to help manage Kubernetes clusters and orchestrate containers.
Ansible is more focused on automation tasks. It’s used by IT administrators and DevOps engineers to automate processes across infrastructure. It can handle a wide range of tasks, from configuring servers and deploying applications to managing networks and security.
2. Learning Curve
OpenShift involves understanding Kubernetes and containerization concepts, which may require a deeper technical understanding of cloud-native applications and orchestration.
Ansible, on the other hand, is simpler to learn, especially for those already familiar with scripting and system administration tasks. It uses YAML, which is straightforward and easy to read.
3. Integration
OpenShift integrates well with cloud-native applications, CI/CD pipelines, and container technologies like Docker and Kubernetes. It helps developers and operations teams collaborate to deploy and scale applications efficiently.
Ansible integrates seamlessly with a wide variety of IT infrastructure, including servers, network devices, and cloud environments, and can be used with other tools to automate configurations, deployments, and updates.
4. Skillset Focus
OpenShift requires a solid understanding of containerization, microservices, and cloud architectures. If you’re pursuing a career as a Kubernetes administrator, cloud architect, or DevOps engineer, learning OpenShift will be beneficial.
Ansible is a great tool for automation, configuration management, and orchestration. If you are aiming for roles like systems administrator, network engineer, or automation engineer, Ansible will help you optimize and automate your infrastructure.
Which Course Should You Take?
Choosing the right course depends on your career path and goals. Let’s break it down:
1. Take a Red Hat OpenShift Course If:
You want to specialize in container orchestration and management.
Your goal is to work with Kubernetes and cloud-native technologies.
You’re aiming for roles such as Cloud Architect, Kubernetes Administrator, or DevOps Engineer.
You’re working with teams that focus on the development and deployment of microservices-based applications.
2. Take a Red Hat Ansible Course If:
You’re focused on automation, configuration management, and infrastructure optimization.
You want to automate the provisioning and deployment of applications across multiple environments.
You aim for roles such as Systems Administrator, Automation Engineer, or Infrastructure Engineer.
You want a tool that can automate not only applications but also network configurations, cloud provisioning, and security tasks.
Conclusion
Both Red Hat OpenShift and Red Hat Ansible are valuable tools that address different aspects of modern IT infrastructure. OpenShift excels in managing and orchestrating containerized applications in a cloud-native environment, while Ansible simplifies the automation of system configurations and application deployments across various infrastructures.
Ultimately, the best course for you depends on whether you want to focus on cloud-native application management (OpenShift) or IT process automation (Ansible). Many organizations use both tools together, so learning both can give you a well-rounded skill set. However, if you have to choose one, select the course that aligns most closely with your current or future job role and the type of work you’ll be doing.
for more details
hawkstack.com
qcsdclabs.com
0 notes
Text
Unlocking Business Agility with Red Hat Ansible Automation Platform and Red Hat OpenShift
In today’s fast-paced digital world, businesses need tools that enable agility, scalability, and efficiency. Two standout solutions leading the charge in IT automation and containerization are Red Hat Ansible Automation Platform and Red Hat OpenShift. These tools empower organizations to streamline operations, automate repetitive tasks, and deploy applications faster. Let’s dive into what makes these platforms essential for modern IT environments.
Red Hat Ansible Automation Platform: Simplify IT Automation
The Red Hat Ansible Automation Platform is a robust, enterprise-grade solution that brings simplicity to complex IT environments. By enabling businesses to automate repetitive tasks, it not only saves time but also reduces the likelihood of human error. Here's how it transforms IT operations:
Unified Automation Framework: Centralize and streamline IT workflows across multiple teams and environments.
Agentless Architecture: Ansible’s agentless design eliminates the need for additional software installation on target machines, reducing overhead.
Scalability: From small-scale automation to large, complex deployments, Ansible adapts seamlessly.
Customizable Playbooks: Create reusable, human-readable playbooks to automate tasks such as configuration management, application deployment, and network provisioning.
With Ansible, businesses can focus on innovation rather than mundane tasks, paving the way for enhanced productivity.
Red Hat OpenShift: The Future of Application Development
Red Hat OpenShift is a Kubernetes-powered platform that simplifies application development and deployment. As businesses embrace cloud-native architectures, OpenShift provides the tools to build, run, and manage applications across hybrid and multi-cloud environments. Here’s why OpenShift is a game-changer:
Integrated Kubernetes: A fully managed Kubernetes environment ensures seamless container orchestration.
Developer-Centric Tools: Integrated CI/CD pipelines and developer workflows accelerate the path from code to production.
Hybrid Cloud Support: Deploy and manage applications consistently across on-premises, public, and private clouds.
Enhanced Security: Built-in security features, such as role-based access control (RBAC) and vulnerability scanning, provide peace of mind.
By adopting OpenShift, organizations can innovate faster while maintaining control and security.
The Power of Combining Ansible and OpenShift
When used together, Ansible Automation Platform and OpenShift create a synergistic effect that enhances operational efficiency and accelerates digital transformation. Here’s how:
Automated Deployments: Use Ansible to automate the provisioning and management of OpenShift clusters.
Consistent Configurations: Ensure uniform configurations across development, testing, and production environments.
Streamlined DevOps: Simplify complex DevOps workflows by integrating Ansible’s automation capabilities with OpenShift’s container orchestration.
This combination allows businesses to deploy applications faster, scale effortlessly, and reduce time-to-market.
Why Businesses Choose Red Hat
Red Hat’s commitment to open-source innovation and enterprise-grade solutions makes it a trusted partner for organizations worldwide. By leveraging tools like Ansible Automation Platform and OpenShift, businesses can achieve:
Greater agility in responding to market demands
Reduced operational costs through automation
Enhanced collaboration between development and operations teams
Get Started Today
Ready to transform your IT operations and accelerate innovation? Explore how Red Hat Ansible Automation Platform and Red Hat OpenShift can revolutionize your business. Contact us to learn more or schedule a demo.
For more details www.hawkstack.com
#redhatcourses#information technology#containerorchestration#kubernetes#container#docker#linux#containersecurity#dockerswarm
0 notes
Text
Integrating Virtual Machines with Containers Using OpenShift Virtualization
As organizations increasingly adopt containerization to modernize their applications, they often encounter challenges integrating traditional virtual machine (VM)-based workloads with containerized environments. OpenShift Virtualization bridges this gap, enabling organizations to run VMs alongside containers seamlessly within the same platform. This blog explores how OpenShift Virtualization helps achieve this integration and why it’s a game-changer for hybrid environments.
What is OpenShift Virtualization?
OpenShift Virtualization is a feature of Red Hat OpenShift that allows you to manage VMs as first-class citizens alongside containers. It leverages KubeVirt, an open-source virtualization extension for Kubernetes, enabling VM workloads to run natively on the OpenShift platform.
Benefits of Integrating VMs and Containers
Unified Management: Manage VMs and containers through a single OpenShift interface.
Resource Efficiency: Consolidate workloads on the same infrastructure to reduce operational costs.
Simplified DevOps: Use Kubernetes-native tools like kubectl and OpenShift’s dashboards to manage both VMs and containers.
Hybrid Workload Modernization: Gradually transition legacy VM-based applications to containerized environments without disrupting operations.
Key Use Cases
Modernizing Legacy Applications: Migrate monolithic applications running on VMs to OpenShift, enabling container adoption without rewriting the entire codebase.
Hybrid Workloads: Run VM-based databases alongside containerized microservices for better performance and management.
Development and Testing: Spin up VMs for testing or sandbox environments while running production-ready workloads in containers.
How to Integrate VMs with Containers in OpenShift
Install OpenShift Virtualization:
Use the OpenShift OperatorHub to install the OpenShift Virtualization Operator.
Verify the installation by checking the kubevirt namespace and related components.
Create Virtual Machines:
Use the OpenShift web console or CLI to create VMs.
Define VM specifications like CPU, memory, and storage in YAML files.
Example YAML for a VM:
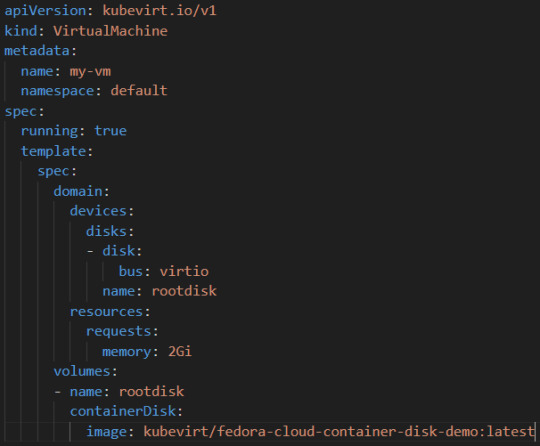
Connect Containers and VMs:
Use OpenShift’s networking capabilities to establish communication between VMs and containerized workloads.
For example, deploy a containerized application that interacts with a VM-based database over a shared network.
Monitor and Manage:
Use OpenShift’s monitoring tools to observe the performance and health of both VMs and containers.
Manage workloads using the OpenShift console or CLI tools like oc and kubectl.
Example: Integrating a VM-Based Database with a Containerized Application
Deploy a VM with a Database:
Create a VM running MySQL.
Expose the database service using OpenShift’s networking capabilities.
Deploy a Containerized Application:
Use OpenShift to deploy a containerized web application that connects to the MySQL database.
Verify Connectivity:
Test the application’s ability to query the database.
Best Practices
Resource Planning: Allocate resources efficiently to avoid contention between VMs and containers.
Security: Leverage OpenShift’s built-in security features like Role-Based Access Control (RBAC) to manage access to workloads.
Automation: Use OpenShift Pipelines or Ansible to automate the deployment and management of hybrid workloads.
Conclusion
OpenShift Virtualization is a powerful tool for organizations looking to unify their infrastructure and modernize applications. By seamlessly integrating VMs and containers, it provides flexibility, efficiency, and scalability, enabling businesses to harness the best of both worlds. Whether you’re modernizing legacy systems or building hybrid applications, OpenShift Virtualization simplifies the journey and accelerates innovation.
For more details visit : https://www.hawkstack.com/
0 notes
Text
OpenShift vs Kubernetes: A Detailed Comparison

When it comes to managing and organizing containerized applications there are two platforms that have emerged. Kubernetes and OpenShift. Both platforms share the goal of simplifying deployment, scaling and operational aspects of application containers. However there are differences between them. This article offers a comparison of OpenShift vs Kubernetes highlighting their features, variations and ideal use cases.
What is Kubernetes? Kubernetes (often referred to as K8s) is an open source platform designed for orchestrating containers. It automates tasks such as deploying, scaling and managing containerized applications. Originally developed by Google and later donated to the Cloud Native Computing Foundation (CNCF) Kubernetes has now become the accepted industry standard for container management.
Key Features of Kubernetes Pods: Within the Kubernetes ecosystem, pods serve as the units for deploying applications. They encapsulate one or multiple containers.
Service Discovery and Load Balancing: With Kubernetes containers can be exposed through DNS names or IP addresses. Additionally it has the capability to distribute network traffic across instances in case a container experiences traffic.
Storage Orchestration: The platform seamlessly integrates with storage systems such as on premises or public cloud providers based on user preferences.
Automated. Rollbacks: Kubernetes facilitates rolling updates while also providing a mechanism to revert back to versions when necessary.
What is OpenShift? OpenShift, developed by Red Hat, is a container platform based on Kubernetes that provides an approach to creating, deploying and managing applications in a cloud environment. It enhances the capabilities of Kubernetes by incorporating features and tools that contribute to an integrated and user-friendly platform.
Key Features of OpenShift Tools for Developers and Operations: OpenShift offers an array of tools that cater to the needs of both developers and system administrators.
Enterprise Level Security: It incorporates security features that make it suitable for industries with regulations.
Seamless Developer Experience: OpenShift includes a built in integration/ deployment (CI/CD) pipeline, source to image (S2I) functionality, as well as support for various development frameworks.
Service Mesh and Serverless Capabilities: It supports integration with Istio based service mesh. Offers Knative, for serverless application development.
Comparison; OpenShift, vs Kubernetes 1. Installation and Setup: Kubernetes can be set up manually. Using tools such as kubeadm, Minikube or Kubespray.
OpenShift offers an installer that simplifies the setup process for complex enterprise environments.
2. User Interface: Kubernetes primarily relies on the command line interface although it does provide a web based dashboard.
OpenShift features a comprehensive and user-friendly web console.
3. Security: Kubernetes provides security features and relies on third party tools for advanced security requirements.
OpenShift offers enhanced security with built in features like Security Enhanced Linux (SELinux) and stricter default policies.
4. CI/CD Integration: Kubernetes requires tools for CI/CD integration.
OpenShift has an integrated CI/CD pipeline making it more convenient for DevOps practices.
5. Pricing: Kubernetes is open source. Requires investment in infrastructure and expertise.
OpenShift is a product with subscription based pricing.
6. Community and Support; Kubernetes has a community, with support.
OpenShift is backed by Red Hat with enterprise level support.
7. Extensibility: Kubernetes: It has an ecosystem of plugins and add ons making it highly adaptable.
OpenShift:It builds upon Kubernetes. Brings its own set of tools and features.
Use Cases Kubernetes:
It is well suited for organizations seeking a container orchestration platform, with community support.
It works best for businesses that possess the technical know-how to effectively manage and scale Kubernetes clusters.
OpenShift:
It serves as a choice for enterprises that require a container solution accompanied by integrated developer tools and enhanced security measures.
Particularly favored by regulated industries like finance and healthcare where security and compliance are of utmost importance.
Conclusion Both Kubernetes and OpenShift offer capabilities for container orchestration. While Kubernetes offers flexibility along with a community, OpenShift presents an integrated enterprise-ready solution. Upgrading Kubernetes from version 1.21 to 1.22 involves upgrading the control plane and worker nodes separately. By following the steps outlined in this guide, you can ensure a smooth and error-free upgrade process. The selection between the two depends on the requirements, expertise, and organizational context.
Example Code Snippet: Deploying an App on Kubernetes
apiVersion: v1
kind: Pod
metadata:
name: myapp-pod
labels:
app: myapp
spec:
containers:
- name: myapp-container
image: myapp:1.0 This YAML file is an example of deploying a simple application on Kubernetes. It defines a Pod with a single container running ‘myapp’.
In conclusion, both OpenShift vs Kubernetes��offer robust solutions for container orchestration, each with its unique strengths and use cases. The choice between them should be based on organizational requirements, infrastructure, and the level of desired security and integration.
0 notes
Text
Mastering Wazi: Your Guide to Successful Adoption

An overview of the services offered by Wazi
Staying ahead of the curve in today’s fiercely competitive digital market requires the quick development of innovative digital services. But when it comes to fusing contemporary technology with their core systems including Mainframe applications many firms encounter formidable obstacles. Modernizing core enterprise apps on hybrid cloud platforms requires this integration. Remarkably, 33% of developers do not have the required resources or expertise, which makes it difficult for them to produce high-quality goods and services.
Additionally, 36% of developers find it difficult to collaborate with IT Operations, which causes inefficiencies in the development pipeline. To make matters worse, polls indicate time and time again that “testing” is the main reason project timeframes are delayed. To meet these issues and spur business process change, companies such as State Farm and BNP Paribas are standardizing development tools and methodologies across their platforms.
In what ways does Wazi as Service promote modernity?
Among the solutions that are gaining traction in this environment is “Wazi as a Service.” By supporting safe DevSecOps methods, this cloud-native development and testing environment for z/OS apps is transforming the modernization process. It offers on-demand access to z/OS systems with flexible consumption-based pricing. By speeding up release cycles in safe, regulated hybrid cloud environments like IBM Cloud Framework for Financial Services (FS Cloud), it significantly increases developer productivity.
Software quality is improved by shift-left coding techniques, which enable testing to start as early as the code-writing phase. By utilizing the IBM Cloud Security and Compliance Center service, the platform may be automated using a standardized architecture that has been validated for Financial Services (SCC). IBM Z modernization tools include CI/CD pipelines, Wazi Image Builder, Wazi Dev Spaces on OpenShift, z/OS Connect for APIs, zDIH for data integrations, and IBM Watson for generative AI enable innovation at scale.
What are the advantages of using IBM Cloud’s Wazi service?
Wazi as a Service offers a significant speed advantage over emulated x86 machine environments because it runs on IBM LinuxONE, an enterprise-grade Linux server. It is 15 times faster thanks to this special feature, which guarantees quick and effective application development. Wazi also fills in the gaps in the developer experiences on mainframe and distributed systems, making it easier to create hybrid applications with z/OS components.
Through the integration of secure DevOps principles with the strength of the z-Mod stack, a smooth and effective development process is produced. The service may be safely installed on IBM FS Cloud, which has integrated security and compliance capabilities, and enables easy scalability through automation, lowering support and maintenance cost. As a result, data security and regulatory compliance may be guaranteed by developers who design and implement their environments and code with industry-grade requirements in mind.
Furthermore, Wazi VSI on VPC architecture within IBM FS Cloud creates a segregated network to strengthen the perimeter of the cloud infrastructure against security breaches. Secure integration of on-premises core Mainframe applications with cloud services like API Connect, Event Streams, Code Engine, and HPCS encryptions is also made possible by the strong security and compliance controls offered by IBM Cloud services and ISVs verified for financial services.
This shift makes it possible for outdated, dispersed solutions to replace centralized core systems, enabling organizations to remain competitive and adaptable in the current digital environment. All things considered, Wazi as a Service is revolutionary in that it speeds up digital transformation while guaranteeing security, compliance, and a smooth transition between old and new technology.
How does the IBM Cloud Financial Service Framework support solutions for the industry?
The Financial Services IBM Cloud Framework, often known as The sturdy IBM FS Cloud solution was created especially to meet the special requirements of financial institutions. It guarantees regulatory compliance, excellent security, and resilience throughout both the initial deployment phase and continuous operations. By defining a set of standards that all parties must adhere to, this framework streamlines communications between financial institutions and ecosystem partners that offer software or SaaS products.
The main elements of this framework are cloud best practices and an extensive set of control requirements that cover security and regulatory compliance needs. By implementing a shared responsibility model that covers financial institutions, application suppliers, and IBM Cloud, these best practices make sure that everyone contributes to keeping an environment that is safe and compliant.
The IBM Cloud Framework for Financial Services also helps financial organizations comply with the strict security and regulatory standards of the financial sector by offering comprehensive control-by-control implementation assistance and supporting data. Reference architectures are offered to help with the implementation of control needs in order to further improve compliance. The deployment and configuration process can be streamlined by using these architectures as infrastructure as code.
In order to enable stakeholders to effectively monitor compliance, handle problems, and produce proof of compliance, IBM also provides a variety of tools and services, such as the IBM Cloud Security and Compliance Center. In addition, the framework is subject to continuous governance, which guarantees that it stays current and in line with new and developing rules as well as the shifting requirements of public cloud environments and banks. The IBM Cloud Framework for Financial Services is essentially a comprehensive solution that streamlines financial institutions’ relationships with ecosystem partners and enables them to operate securely and in accordance with industry norms.
Discover Wazi as a Service
Wazi as a Service, which operates on the reliable IBM LinuxONE infrastructure, allows for the easy development of hybrid applications by bridging the gap between distributed and mainframe platforms. Businesses can flourish in the digital age thanks to the platform’s scalability, automation, and compliance features, which enable developers to manage the complex web of security and laws.
Businesses may advance into the future of modern, distributed solutions by securely integrating cutting-edge cloud services with their on-premises core systems using Wazi. In conclusion, Wazi as a Service emphasizes the significance of technology in attaining security, compliance, and the peaceful coexistence of historical and contemporary technologies, and serves as an excellent example of how technology may accelerate digital transformation.
Read more on Govindhtech.com
0 notes
Text
https://youtu.be/3OfS5QYo77M
#openshiftpipelinesusingtekton #openshift4 #tektonpipelines #CICDpipelines #continuousintegration openshift pipelines using tekton,openshift pipelines using tektonan,openshift,installing openshift pipelines,openshift pipelines based on tekton,tekton,kubernetes,openshift pipelines using tektonic,openshift pipelines tutorial using…
View On WordPress
#application using tektoncd pipelines#ci cd pipelines in openshift#cicd#cli tekton pipelines operator#cloud-native#containers#continuous integration#installing openshift pipelines#kubernetes#openshift#openshift pipelines based on tekton#openshift pipelines tutorial using tekton#openshift pipelines using tekton#openshift pipelines using tektonan#openshift pipelines using tektonic#pipeline#pipelines#pipelines on red hat openshift#red hat#tekton#tekton-pipelines#tektoncd
0 notes
Text
If you’re running a Kubernetes Cluster in an AWS Cloud using Amazon EKS, the default Container Network Interface (CNI) plugin for Kubernetes is amazon-vpc-cni-k8s. By using this CNI plugin your Kubernetes pods will have the same IP address inside the pod as they do on the VPC network. The problem with this CNI is the large number of VPC IP addresses required to run and manage huge clusters. This is the reason why other CNI plugins such as Calico is an option. Calico is a free to use and open source networking and network security plugin that supports a broad range of platforms including Docker EE, OpenShift, Kubernetes, OpenStack, and bare metal services. Calico offers true cloud-native scalability and delivers blazing fast performance. With Calico you have the options to use either Linux eBPF or the Linux kernel’s highly optimized standard networking pipeline to deliver high performance networking. For multi-tenant Kubernetes environments where isolation of tenants from each other is key, Calico network policy enforcement can be used to implement network segmentation and tenant isolation. You can easily create network ingress and egress rules to ensure proper network controls are applied to services. Install Calico CNI plugin on Amazon EKS Kubernetes Cluster These are the points to note before implementing the solution: If using Fargate with Amazon EKS Calico is not supported. If you have rules outside of Calico policy consider adding existing iptables rules to your Calico policies to avoid having rules outside of Calico policy overridden by Calico. If you’re using security groups for pods, traffic flow to pods on branch network interfaces is not subjected to Calico network policy enforcement and is limited to Amazon EC2 security group enforcement only Step 1: Setup EKS Cluster I assume you have a newly created EKS Kubernetes Cluster. Our guide can be used to deploy an EKS cluster as below. Easily Setup Kubernetes Cluster on AWS with EKS Once the cluster is running, confirm it is available with eksctl: $ eksctl get cluster -o yaml - name: My-EKS-Cluster region: eu-west-1 Step 2: Delete AWS VPC networking Pods Since in our EKS cluster we’re going to use Calico for networking, we must delete the aws-node daemon set to disable AWS VPC networking for pods. $ kubectl delete ds aws-node -n kube-system daemonset.apps "aws-node" deleted Confirm all aws-node Pods have been deleted. $ kubectl get pods -n kube-system NAME READY STATUS RESTARTS AGE coredns-6987776bbd-4hj4v 1/1 Running 0 15h coredns-6987776bbd-qrgs8 1/1 Running 0 15h kube-proxy-mqrrk 1/1 Running 0 14h kube-proxy-xx28m 1/1 Running 0 14h Step 3: Install Calico CNI on EKS Kubernetes Cluster Download Calico Yaml manifest. wget https://docs.projectcalico.org/manifests/calico-vxlan.yaml Then apply the manifest yaml file to deploy Calico CNI on Amazon EKS cluster. kubectl apply -f calico-vxlan.yaml This is my deployment output showing all objects being created. configmap/calico-config created customresourcedefinition.apiextensions.k8s.io/bgpconfigurations.crd.projectcalico.org created customresourcedefinition.apiextensions.k8s.io/bgppeers.crd.projectcalico.org created customresourcedefinition.apiextensions.k8s.io/blockaffinities.crd.projectcalico.org created customresourcedefinition.apiextensions.k8s.io/clusterinformations.crd.projectcalico.org created customresourcedefinition.apiextensions.k8s.io/felixconfigurations.crd.projectcalico.org created customresourcedefinition.apiextensions.k8s.io/globalnetworkpolicies.crd.projectcalico.org created customresourcedefinition.apiextensions.k8s.io/globalnetworksets.crd.projectcalico.org created customresourcedefinition.apiextensions.k8s.io/hostendpoints.crd.projectcalico.org created customresourcedefinition.apiextensions.k8s.io/ipamblocks.crd.projectcalico.org created
customresourcedefinition.apiextensions.k8s.io/ipamconfigs.crd.projectcalico.org created customresourcedefinition.apiextensions.k8s.io/ipamhandles.crd.projectcalico.org created customresourcedefinition.apiextensions.k8s.io/ippools.crd.projectcalico.org created customresourcedefinition.apiextensions.k8s.io/kubecontrollersconfigurations.crd.projectcalico.org created customresourcedefinition.apiextensions.k8s.io/networkpolicies.crd.projectcalico.org created customresourcedefinition.apiextensions.k8s.io/networksets.crd.projectcalico.org created clusterrole.rbac.authorization.k8s.io/calico-kube-controllers created clusterrolebinding.rbac.authorization.k8s.io/calico-kube-controllers created clusterrole.rbac.authorization.k8s.io/calico-node created clusterrolebinding.rbac.authorization.k8s.io/calico-node created daemonset.apps/calico-node created serviceaccount/calico-node created deployment.apps/calico-kube-controllers created serviceaccount/calico-kube-controllers created Get list of DaemonSets deployed in the kube-system namespace. $ kubectl get ds calico-node --namespace kube-system NAME DESIRED CURRENT READY UP-TO-DATE AVAILABLE NODE SELECTOR AGE calico-node 2 2 0 2 0 kubernetes.io/os=linux 14s The calico-node DaemonSet should have the DESIRED number of pods in the READY state. $ kubectl get ds calico-node --namespace kube-system NAME DESIRED CURRENT READY UP-TO-DATE AVAILABLE NODE SELECTOR AGE calico-node 2 2 2 2 2 kubernetes.io/os=linux 48s Running pods can be checked with kubectl command as well. $ kubectl get pods -n kube-system | grep calico calico-node-bmshb 1/1 Running 0 4m7s calico-node-skfpt 1/1 Running 0 4m7s calico-typha-69f668897f-zfh56 1/1 Running 0 4m11s calico-typha-horizontal-autoscaler-869dbcdddb-6sx2h 1/1 Running 0 4m7s Step 4: Create new nodegroup and delete old one If you had nodes already added to your cluster, we’ll need to add another node group the remove the old node groups and the machines in it. To create an additional nodegroup, use: eksctl create nodegroup --cluster= [--name=] List your clusters to get clustername: $ eksctl get cluster Node group can be created from CLI or Config file. Create Node group from CLI eksctl create nodegroup --cluster --name --node-type --node-ami auto To change maximum number of Pods per node, add: --max-pods-per-node Example: eksctl create nodegroup --cluster my-eks-cluster --name eks-ng-02 --node-type t3.medium --node-ami auto --max-pods-per-node 150 Create from Configuration file – Update nodeGroups section. See be nodeGroups: - name: eks-ng-01 labels: role: workers instanceType: t3.medium desiredCapacity: 2 volumeSize: 80 minSize: 2 maxSize: 3 privateNetworking: true - name: eks-ng-02 labels: role: workers instanceType: t3.medium desiredCapacity: 2 volumeSize: 80 minSize: 2 maxSize: 3 privateNetworking: true For Managed replace nodeGroups with managedNodeGroups. When done apply the configuration to create Node group. eksctl create nodegroup --config-file=my-eks-cluster.yaml Once the new nodegroup is created, delete old one to cordon and migrate all pods. eksctl delete nodegroup --cluster= --name= Or from Config file: eksctl delete nodegroup --config-file=my-eks-cluster.yaml --include= --approve If you check the nodes in your cluster, at first scheduling is disabled: $ kubectl get nodes NAME STATUS ROLES AGE VERSION ip-10-255-101-100.eu-west-1.compute.internal Ready 3m57s v1.17.11-eks-cfdc40 ip-10-255-103-17.eu-west-1.compute.internal Ready,SchedulingDisabled 15h v1.17.11-eks-cfdc40
ip-10-255-96-32.eu-west-1.compute.internal Ready 4m5s v1.17.11-eks-cfdc40 ip-10-255-98-25.eu-west-1.compute.internal Ready,SchedulingDisabled 15h v1.17.11-eks-cfdc40 After few minutes they are deleted. $ kubectl get nodes NAME STATUS ROLES AGE VERSION ip-10-255-101-100.eu-west-1.compute.internal Ready 4m45s v1.17.11-eks-cfdc40 ip-10-255-96-32.eu-west-1.compute.internal Ready 4m53s v1.17.11-eks-cfdc40 If you describe new Pods you should notice a change in its IP address: $ kubectl describe pods coredns-6987776bbd-mvchx -n kube-system Name: coredns-6987776bbd-mvchx Namespace: kube-system Priority: 2000000000 Priority Class Name: system-cluster-critical Node: ip-10-255-101-100.eu-west-1.compute.internal/10.255.101.100 Start Time: Mon, 26 Oct 2020 15:24:16 +0300 Labels: eks.amazonaws.com/component=coredns k8s-app=kube-dns pod-template-hash=6987776bbd Annotations: cni.projectcalico.org/podIP: 192.168.153.129/32 cni.projectcalico.org/podIPs: 192.168.153.129/32 eks.amazonaws.com/compute-type: ec2 kubernetes.io/psp: eks.privileged Status: Running IP: 192.168.153.129 IPs: IP: 192.168.153.129 Controlled By: ReplicaSet/coredns-6987776bbd .... Step 5: Install calicoctl command line tool The calicoctl enables cluster users to read, create, update, and delete Calico objects from the command line interface. Run the commands below to install calicoctl. Linux: curl -s https://api.github.com/repos/projectcalico/calicoctl/releases/latest | grep browser_download_url | grep linux-amd64 | grep -v wait | cut -d '"' -f 4 | wget -i - chmod +x calicoctl-linux-amd64 sudo mv calicoctl-linux-amd64 /usr/local/bin/calicoctl macOS: curl -s https://api.github.com/repos/projectcalico/calicoctl/releases/latest | grep browser_download_url | grep darwin-amd64| grep -v wait | cut -d '"' -f 4 | wget -i - chmod +x calicoctl-darwin-amd64 sudo mv calicoctl-darwin-amd64 /usr/local/bin/calicoctl Next read how Configure calicoctl to connect to your datastore.
0 notes
Text
Red Hat OpenShift Container Platform Certification.
The Red Hat OpenShift certification exam is a performance-based exam that evaluates your knowledge and skills. It includes both objective and reference materials, as well as a hands-on component. You can take the exam online, in a classroom, or in a training center.
Upon completing the course, you will have the knowledge and skills to administer a Red Hat OpenShift cluster. You will also learn how to automate tasks, deploy CI/CD pipelines, and manage container storage. You'll also learn how to manage an OpenShift cluster's infrastructure and troubleshoot issues. If you are interested in becoming a certified Red Hat OpenShift administrator, you should consider taking the DO180 and DO280 courses first.
OpenShift is an enterprise Kubernetes platform that helps enterprises automate application build, deployment, and lifecycle management. There are hundreds of resources to learn OpenShift, including beginner-level courses and certification track courses. If you're looking to become a certified OpenShift operator, you'll be well-positioned to capitalize on a growing market by bringing your skills and expertise to market. By earning your Red Hat OpenShift certification, you'll have the chance to increase your visibility and provide a consistent experience to OpenShift users. You'll also be eligible to join Red Hat's Connect Partner Program, which offers marketing and technical benefits for both your organization and Red Hat.
For all Cloud Pak opportunities, Red Hat OpenShift Container Platform certification is required. The certification also allows you to support cloud native application development and modernization. The Red Hat Certified Specialist in OpenShift Application Development exam tests your skills in deploying existing applications in an OpenShift container platform environment.
Red Hat has several certification tracks for the OpenShift platform, including the Red Hat Certified Systems Administrator (RHCSA) certification and the Red Hat Certified Specialist in Containers and Kubernetes (RHCSA). Red Hat also offers remote exams for students starting in August 2020. You can learn more about these exams in the Red Hat Remote Exam Guide. For administrators, the Red Hat Certified Specialist in OpenShift Administration track provides training in administration tasks for Red Hat OpenShift clusters. This certification also covers user policies.
The Red Hat Certified Specialist in OpenShift Administration certification includes three courses. The first course covers the basics of containers and Kubernetes, which provide the foundational services for the Red Hat OpenShift Container Platform. The second course teaches the installation, configuration, and management of a cluster. Students also learn about troubleshooting and deployment methods.
The Red Hat certification is important for both your business and your staff's success. It helps you to improve IT efficiency and productivity by allowing for more flexibility and agility. Successful IT operations and digital transformation are driven by agility. A certified staff is better able to handle complex tasks and provide more value. Having the Red Hat certification will set you apart from other employees and make you more productive. This certification is valuable and will increase the chances of your success.
The Red Hat OpenShift platform offers an enterprise-grade Kubernetes container platform. It gives you the freedom to deploy applications to any location. It supports dozens of technologies and provides full-stack automated operations. With the help of this platform, you can migrate existing workloads to the cloud and create a new experience for your customers.
0 notes
Text
A brief overview of Jenkins X
What is Jenkins X?
Jenkins X is an open-source solution that provides automatic seamless integration and continuous distribution (CI / CD) and automated testing tools for cloud-native applications in Cubernet. It supports all major cloud platforms such as AWS, Google Cloud, IBM Cloud, Microsoft Azure, Red Hat OpenShift, and Pivotal. Jenkins X is a Jenkins sub-project (more on this later) and employs automation, DevOps best practices and tooling to accelerate development and improve overall CI / CD.
Features of Jenkins X
Automated CI /CD:
Jenkins X offers a sleek jx command-line tool, which allows Jenkins X to be installed inside an existing or new Kubernetes cluster, import projects, and bootstrap new applications. Additionally, Jenkins X creates pipelines for the project automatically.
Environment Promotion via GitOps:
Jenkins X allows for the creation of different virtual environments for development, staging, and production, etc. using the Kubernetes Namespaces. Every environment gets its specific configuration, list of versioned applications and configurations stored in the Git repository. You can automatically promote new versions of applications between these environments if you follow GitOps practices. Moreover, you can also promote code from one environment to another manually and change or configure new environments as needed.
Extensions:
It is quite possible to create extensions to Jenkins X. An extension is nothing but a code that runs at specific times in the CI/CD process. You can also provide code through an extension that runs when the extension is installed, uninstalled, as well as before and after each pipeline.
Serverless Jenkins:
Instead of running the Jenkins web application, which continually consumes a lot of CPU and memory resources, you can run Jenkins only when you need it. During the past year, the Jenkins community has created a version of Jenkins that can run classic Jenkins pipelines via the command line with the configuration defined by code instead of the usual HTML forms.
Preview Environments:
Though the preview environment can be created manually, Jenkins X automatically creates Preview Environments for each pull request. This provides a chance to see the effect of changes before merging them. Also, Jenkins X adds a comment to the Pull Request with a link for the preview for team members.
How Jenkins X works?
The developer commits and pushes the change to the project’s Git repository.
JX is notified and runs the project’s pipeline in a Docker image. This includes the project’s language and supporting frameworks.
The project pipeline builds, tests, and pushes the project’s Helm chart to Chart Museum and its Docker image to the registry.
The project pipeline creates a PR with changes needed to add the project to the staging environment.
Jenkins X automatically merges the PR to Master.
Jenkins X is notified and runs the staging pipeline.
The staging pipeline runs Helm, which deploys the environment, pulling Helm charts from Chart Museum and Docker images from the Docker registry. Kubernetes creates the project’s resources, typically a pod, service, and ingress.
0 notes
Text
What Are The Best Devops Tools That Should Be Used In 2022?

Actually, that's a marketing stunt let me rephrase that by saying what are the best tools for developers and operators and everything in between in 2022 and you can call it devops I split them into different categories so let me read the list and that's ids terminals shell packaging Kubernetes distribution serverless Github progressive delivery infrastructures code programming language cloud logging monitoring deployment security dashboards pipelines and workflows service mesh and backups I will not go into much details about each of those tools that would take hours but I will provide the links to videos or descriptions or useful information about each of the tools in this blog. If you want to see a link to the home page of the tool or some useful information let's get going.
Let's start with ids the tool you should be using the absolute winner in all aspects is visual studio code it is open source it is free it has a massive community massive amount of plugins there is nothing you cannot do with visual studio code so ids clear winner visual studio code that's what you should be using next are terminals, unlike many others that recommend an item or this or different terminals I recommend you use a terminal that is baked into visual studio code it's absolutely awesome you cannot go wrong and you have everything in one place you write your code you write your manifest you do whatever you're doing and you have a terminal baked in using the terminal in visual studio code there is no need to use an external terminal shell the best shell you can use you will feel at home and it features some really great things.

Experience if you're using windows then install wsl or windows subsystem for Linux and then install ssh and of my ssh next packaging how do we package applications today that's containers containers containers actually we do not packages containers we package container images that are a standard now it doesn't matter whether you're deploying to Kubernetes whether you're deploying directly to docker whether you're using serverless even most serverless today solutions allow you to run containers that means that you must and pay attention that didn't say should you must package your applications as container images with few exceptions if you're creating clips or desktop applications then package it whatever is the native for that operating system that's the only exception everything else container images doesn't matter where you're deploying it and how should you build those container images you should be building it with docker desktop docker.
if you're building locally and you shouldn't be building locally if you're building through some cicd pipelines so whichever other means that it's outside of your laptop use kubernetes is the best solution to build container images today next in line kubernetes distribution or service or platform which one should you use and that depends where you're running your stuff if it's in cloud use whatever your provider is offering you're most likely not going to change the provider because of kubernetes service but if you're indifferent and you can choose any provider to run your kubernetes clusters then gke google kubernetes engine is the best choice it is ahead of everybody else that difference is probably not sufficient for you to change your provider but if you're undecided where to run it then google cloud is the place but if you're using on-prem servers then probably the best solution is launcher unless you have very strict and complicated security requirements then you should go with upper shift if you want operational simplicity and simplicity in any form or way then go with launcher if you have tight security needs then openshift is the thing finally if you want to run kubernetes cluster locally then it's k3d k3d is the best way to run kubernetes cluster locally you can run a single cluster multi-cluster single node multi-node and it's lightning fast it takes couple of seconds to create a cluster and it uses minimal amount of resources it's awesome try it out serverless and that really depends what type of serverless you want if you want functions as a service aws lambda is the way to go they were probably the first ones to start at least among big providers and they are leading that area but only for functions as a service.
If you wanted containers as a service type of serverless and i think you should want containers as a service anyways if you want containers as a service flavor of serverless then google cloud run is the best option in the market today finally if you would like to run serverless on-prem then k native which is actually the engine behind the google cloud run anyways k native is the way to go if you want to run serverless workloads in your own clusters on-prem githubs and here i do not have a clear recommendation because both argo cd and flux are awesome they have some differences there are some weaknesses pros and cons for each and they cannot make up my mind both of them are awesome and it's like arms race you know cold war as soon as one gets a cool feature the other one gets it as well and then the circle continues both of them are more or less equally good you cannot go wrong with either progressive delivery is in a similar situation you can use algorithms or flagger you're probably going to choose one or the other depending on which github solution you chose because argo rollouts works very well with dargo cd flagger works exceptionally well with the flux and you cannot go wrong with either you're most likely going to choose the one that belongs to the same family as the github's tool that you choose previously infrastructure is code has two winners in this case one is terraform terraform is the leader of the market it has the biggest community it is stable it exists for a long time and everybody is using it you cannot go wrong with terraform but if you want to get a glimpse of the future of potential future we don't know the future but potential future with additional features especially if you want something that is closer to kubernetes that is closer to the ecosystem of kubernetes then you should go with crossplane.
In my case i'm combining both i'm still having most of my workloads in terraform and then transitioning slowly to cross plane when that makes sense for programming languages it depends really what you're doing if you're working on a front end and i it's javascript there is nothing else in the world everything is javascript don't even bother looking for something else for everything else go is the way to go that that rhymes right go is the way to go excellent go is the language that everybody is using today i mean not everybody minority of us are using go but it is increasing in polarity greatly especially if you're working on microservices or smaller applications footprint of go is very small it is lightning fast just try it out if you haven't already if for no other reason you should put go on your curriculum because it's all the hype and for a very good reason it has its problems every language has its problems but you should use it even if that's only for hobby projects next inline cloud which provider should be using i cannot answer the question aws is great azure is great google cloud is great if you want to save money at the expense of the catalog of the offers and the stability and whatsoever then go with linux or digitalocean personally when i can choose and i have to choose then i go with google cloud as for logging solutions if you're in cloud go with whatever your cloud provider is giving you as long as that is not too expensive for your budget.
If you have to choose something else something outside of the offering of your cloud use logs is awesome it's very similar to prometus it works well it has low memory and cpu footprint if you're choosing your own solution instead of going with whatever provider is giving you lockheed is the way to go for monitoring it's prometheus you have to have promote use even if you choose something else you will have to have prometheus on top of that something else for a simple reason that many of the tools frameworks applications what's or not are assuming that you're using promit use from it you see is the de facto standard and you will use it even if you already decided to use something else because it is unavoidable and it's awesome at the same time for deployment mechanisms packaging templating i have two i cannot make up my mind i use customize and i use helm and you should probably combine both because they have different strengths and weaknesses if you're an operator and you're not tasked to empower developers then customize is a better choice no doubt now if you want to simplify lives of developers who are not very proficient with kubernetes then helm is the easiest option for them it will not be easiest for you but for them yes next in line is security for scanning you sneak sneak is a clear winner at least today for governance legal requirements compliance and similar subjects i recommend opa gatekeeper it is the best choice we have today even though that market is bound to explode and we will see many new solutions coming very very soon next in line are dashboards and this was the easiest one for me to pick k9s use k9s especially if you like terminals it's absolutely awesome try it out k9s is the best dashboard at least when kubernetes is concerned for pipelines and workflows it really depends on how much work you want to invest in it yourself if you want to roll up your sleeves and set it up yourself it's either argo workflows combined with argo events or tecton combined with a few other things they are hand-in-hand there are pros and cons for each but right now there is no clear winner so it's either argo workflows combined with events or tactile with few other additional tools among the tools that require you to set them up properly there is no competition those are the two choices you have now.
If you want not to think much about pipelines but just go with the minimal effort everything integrated what's or not then i recommend code rush now i need to put a disclaimer here i worked in code fresh until a week ago and you might easily see that i'm too subjective and that might be true i try not to be but you never know serious mesh service mesh is in a similar situation like infrastructure is code most of the implementations are with these two today easter is the de facto standard but i believe that we are moving towards slinkerty being the dominant player for a couple of reasons the main one being that it is independently managed it is in the cncf foundation and nobody really owns it on top of that linker d is more lightweight it is easier to learn it doesn't have all the features of youtube but you likely do not need the features that are missing anyway finally linkedin is based on smi or service mesh interface and that means that you will be able to switch from linker d to something else if you choose to do so in the future easter has its own interface it is incompatible with anything else finally the last category i have is backups and if you're using kubernetes and everybody is using kubernetes today right use valero it is the best option we have today to create backups it works amazingly well as long as you're using kubernetes.
If you're not using Kubernetes then just zip it up and put it on a tape as we were doing a long long time ago that was the list of the recommendation of the tools platforms frameworks whatsoever that you should be using in 2022 i will make a similar blog in the future and i expect you to tell me a couple of things which categories did i miss what would you like me to include in the next blog of this kind what are the points you do not agree with me let's discuss it i might be wrong most of the time I'm wrong so please let me know if you disagree about any of the tools or categories that i mentioned we are done, Cloud now technologies ranked as top three devops services company in usa.Cloud now technologies devops service delivery at high velocity with cost savings through accelerated software deployment.
#devops services company in usa#devops consulting services#devops services company#devops services#agile devops consulting#cloud computing#cloud advisory#cloud managed services#Cloud migiration#cloud#applicationdevelopment#apps#application modernization#app development#app developing company#devops#devops service providers#agile devops
0 notes
Text
Master Multicluster Kubernetes with DO480: Red Hat OpenShift Platform Plus Training
In today’s enterprise landscape, managing multiple Kubernetes clusters across hybrid or multi-cloud environments is no longer optional — it’s essential. Whether you’re scaling applications globally, ensuring high availability, or meeting regulatory compliance, multicluster management is the key to consistent, secure, and efficient operations.
That’s where Red Hat OpenShift Platform Plus and the DO480 course come in.
🔍 What is DO480?
DO480: Multicluster Management with Red Hat OpenShift Platform Plus is an advanced, hands-on course designed for platform engineers, cluster admins, and DevOps teams. It teaches how to manage and secure Kubernetes clusters at scale using Red Hat’s enterprise-grade tools like:
Red Hat Advanced Cluster Management (ACM) for Kubernetes
Red Hat Advanced Cluster Security (ACS) for Kubernetes
OpenShift GitOps and Pipelines
Multi-cluster observability
📌 Why Should You Learn DO480?
As enterprises adopt hybrid and multi-cloud strategies, the complexity of managing Kubernetes clusters increases. DO480 equips you with the skills to:
✅ Deploy, govern, and automate multiple clusters ✅ Apply security policies consistently across all clusters ✅ Gain centralized visibility into workloads, security posture, and compliance ✅ Use GitOps workflows to streamline multicluster deployments ✅ Automate Day-2 operations like backup, disaster recovery, and patch management
👨💻 What Will You Learn?
The DO480 course covers key topics, including:
Installing and configuring Red Hat ACM
Creating and managing cluster sets, placement rules, and application lifecycle
Using OpenShift GitOps for declarative deployment
Integrating ACS for runtime and build-time security
Enforcing policies and handling compliance at scale
All these are practiced through hands-on labs in a real-world environment.
🎯 Who Should Attend?
This course is ideal for:
Platform engineers managing multiple clusters
DevOps professionals building GitOps-based automation
Security teams enforcing policies across cloud-native environments
Anyone aiming to become a Red Hat Certified Specialist in Multicluster Management
🔒 Certification Path
Completing DO480 helps prepare you for the Red Hat Certified Specialist in Multicluster Management exam — a valuable addition to your Red Hat Certified Architect (RHCA) journey.
🚀 Ready to Master Multicluster Kubernetes? Enroll in DO480 – Multicluster Management with Red Hat OpenShift Platform Plus and gain the skills needed to control, secure, and scale your OpenShift environment like a pro.
🔗 Talk to HawkStack today to schedule your corporate or individual training. 🌐 www.hawkstack.com
0 notes
Link
Container technologies are transforming the way we think about application development and the speed at which teams can deliver on business needs. They promise application portability across hybrid cloud environments and help developers to focus on building a great product, without interrupting underlying infrastructure or execution details.

Containers deploy for much shorter periods of time than virtual machines (VMs), with greater utilization of underlying resources. The container technologies must manage far more objects with greater turnover, introducing the need for more automated, policy-driven management. Many IT companies are turning to Kubernetes and its wide variety of complex features to help them orchestrate and manage containers in production, development, and test environments.
OpenShift is a group of containerization software products developed by Red Hat. Its flagship product is the OpenShift Container Platform — an on-premises platform as a service built around Docker containers orchestrated and managed by Kubernetes on a foundation of Red Hat Enterprise Linux. The family’s other products provide this platform through different conditions: OKD serves as the community-driven upstream, OpenShift Online is the platform provided as software as a service, and OpenShift Dedicated is the platform offered as a managed service.
OpenShift is a turn-key enterprise grade, secure and reliable containerisation tool built on open source Kubernetes. It is built on the open source Kubernetes with extra features to provide out of the box self-service, dashboards, automation-CI/CD, container image registry, multilingual support, and other Kubernetes extensions, enterprise grade features.
By using OpenShift Pipelines developers and cluster administrators can automate the processes of building, testing and deploying application code to the platform. With pipelines, it is possible to reduce human error with a consistent process. A pipeline includes compiling code, unit tests, code analysis, security, installer creation, container build and deployment.
As a result of the heightened industrial importance of containers, Red Hat extends two of their core Linux courses by a day to include containers. Beginning Oct. 1, 2020, Red Hat System Administration II (RH134) and RHCSA Rapid Track course (RH199) extended from four to five days with the final day focused on the container, Kubernetes, and OpenShift content. The students who have purchased or taken either course within the last year will be given free access to the added course materials and virtual training, which will help them to prepare for the upcoming changes to the Red Hat Certified System Administrator exam (EX200).
This changes to RHCSA courses allows for our Red Hat Certified System Administrator exam (EX200) exam to include container material as well. This updated exam content will give test-takers hands-on experience in real world container applications and will extend the duration of the exam by 30 minutes. RHCSA Exam EX200 version 7 will not be impacted by these changes. Content updates are only occurring on Red Hat Enterprise Linux 8 RH199, RH134, EX200.
For extended support and reach there are various RHCSA training in Kochi to get your path on the right track. Reach out to the best solutions. Always learn to understand more and more. With various RHCSA courses in Kochi readily available to provide services, anything is possible. All that is needed is just to connect with a dependable solution. https://www.stepskochi.com/blog/red-hat-openshift-2/
0 notes
Text
Red Hat Training Categories: Empowering IT Professionals for the Future
Red Hat, a leading provider of enterprise open-source solutions, offers a comprehensive range of training programs designed to equip IT professionals with the knowledge and skills needed to excel in the rapidly evolving world of technology. Whether you're an aspiring system administrator, a seasoned DevOps engineer, or a cloud architect, Red Hat's training programs cover key technologies and tools that drive modern IT infrastructures. Let’s explore some of the key Red Hat training categories.
1. Red Hat Enterprise Linux (RHEL)
RHEL is the foundation of many enterprises, and Red Hat offers extensive training to help IT professionals master Linux system administration, automation, and security. Key courses in this category include:
Red Hat Certified System Administrator (RHCSA): An essential certification for beginners in Linux administration.
Red Hat Certified Engineer (RHCE): Advanced training in system administration, emphasizing automation using Ansible.
Security and Identity Management: Focuses on securing Linux environments and managing user identities.
2. Ansible Automation
Automation is at the heart of efficient IT operations, and Ansible is a powerful tool for automating tasks across diverse environments. Red Hat offers training on:
Ansible Basics: Ideal for beginners looking to understand how to automate workflows and deploy applications.
Advanced Ansible Automation: Focuses on optimizing playbooks, integrating Ansible Tower, and managing large-scale deployments.
3. OpenShift Container Platform
OpenShift is Red Hat’s Kubernetes-based platform for managing containerized applications. Red Hat training covers topics like:
OpenShift Administration: Learn how to install, configure, and manage OpenShift clusters.
OpenShift Developer: Build, deploy, and scale containerized applications on OpenShift.
4. Red Hat Cloud Technologies
With businesses rapidly adopting cloud technologies, Red Hat’s cloud training programs ensure that professionals are prepared for cloud-native development and infrastructure management. Key topics include:
Red Hat OpenStack: Learn how to deploy and manage private cloud environments.
Red Hat Virtualization: Master the deployment of virtual machines and manage large virtualized environments.
5. DevOps Training
Red Hat is committed to promoting DevOps practices, helping teams collaborate more efficiently. DevOps training includes:
Red Hat DevOps Pipelines and CI/CD: Learn how to streamline software development, testing, and deployment processes.
Container Development and Kubernetes Integration: Get hands-on experience with containerized applications and orchestrating them using Kubernetes.
6. Cloud-Native Development
As enterprises move towards microservices and cloud-native applications, Red Hat provides training on developing scalable and resilient applications:
Microservices Architecture: Learn to build and deploy microservices using Red Hat’s enterprise open-source tools.
Serverless Application Development: Focus on building lightweight applications that scale on demand.
7. Red Hat Satellite
Red Hat Satellite simplifies Linux system management at scale, and its training focuses on:
Satellite Server Administration: Learn how to automate system maintenance and streamline software updates across your RHEL environment.
8. Security and Compliance
In today's IT landscape, security is paramount. Red Hat offers specialized training on securing infrastructure and ensuring compliance:
Linux Security Essentials: Learn to safeguard Linux environments from vulnerabilities.
Advanced Security Features: Cover best practices for maintaining security across hybrid cloud environments.
Why Red Hat Training?
Red Hat certifications are globally recognized, validating your expertise in open-source technologies. They offer hands-on, practical training that helps professionals apply their knowledge directly to real-world challenges. By investing in Red Hat training, you are preparing yourself for future innovations and ensuring that your skills remain relevant in an ever-changing industry.
Conclusion
Red Hat training empowers IT professionals to build, manage, and secure the enterprise-grade systems that are shaping the future of technology. Whether you're looking to enhance your Linux skills, dive into automation with Ansible, or embrace cloud-native development, there’s a Red Hat training category tailored to your needs.
For more details click www.hawkstack.com
#redhatcourses#docker#information technology#kubernetes#containerorchestration#container#linux#dockerswarm#hawkstack#hawkstack technologies
0 notes
Link
About the Bank
The Customer is an international banking group, with around 86,000 employees and a 150-year history in some of the world’s most dynamic markets. Although they are based in London, the vast majority of their customers and employees are in Asia, Africa and the Middle East. The company is a leader in the personal, consumer, corporate, institutional and treasury segments.
Challenge: To Provide an Uninterrupted Customer Experience
The Bank wanted to stay ahead of the competition. The only way to succeed in today’s digital world is to deliver services faster to customers, so they needed to modernize their IT infrastructure. As part of a business expansion, entering eight additional markets in Africa and providing virtual banking services in Hong Kong, they needed to roll out new retail banking services. The new services would enhance customer experience, improve efficiency, and build a “future proof” retail bank.
Deploying these new services created challenges that needed to be overcome quickly, or risk delaying the entry into the new markets.
Sluggish Deployments for Monolithic Applications
The bank was running monolithic applications on old Oracle servers, located in HK and the UK, that served Africa, the Middle East, and South Asia Grade. Each upgrade forced a significant downtime across all regions that prevented customers from accessing their accounts. This was not true for the bank’s competitors, and it threatened to become a major source of customer churn.
Need for Secured Continuous Delivery Platform
As part of the bank’s digital transformation, they decided to move many services to a container-based infrastructure. They chose Kubernetes and Red Hat OpenShift as their container environment. To take advantage of the ability to update containers quickly, they also decided to move to a continuous delivery (CD) model, enabling updates without downtime. Their existing deployment tool was unsuitable for the new environment.
Of course, strict security of the platform and the CD process was an absolute requirement. Additionally, the bank required easy integration to support a broad range of development and CI tools and a high performance solution capable of scaling to the bank’s long term needs.
Lack of Continuous Delivery Expertise
The bank’s IT team, operating on multiple continents, was stretched thin with the migration to OpenShift and containers. Further, their background in software deployment simply did not include experience with continuous delivery. The bank needed a trusted partner who could provide a complete solution – software and services – to reduce the risk of delays or problems that could hobble the planned business expansion.
Solution: A Secured CD Platform to Deploy Containerised Applications
After a thorough evaluation, the bank chose OpsMx Enterprise for Spinnaker (OES) as their CD solution. They chose OES for its ability to scale, high security, and integration with other tools. They chose OpsMx because of their expertise with Spinnaker and continuous delivery and their deep expertise in delivering a secure environment.
Correcting Security Vulnerabilities
There are four main security requirements not available in the default OSS Spinnaker which are satisfied by OpsMx.
Validated releases: Spinnaker is updated frequently due to the active participation of the open source community. However, the bank required that each release be scanned for vulnerabilities and hardened before installation in the bank’s environment. OpsMx delivers this as part of the base system, so OpsMx customers know that the base platform has not been compromised.
Air gapped environment: The bank, like many security-conscious organizations, isolates key environments from the public internet to increase security. OES fully supports air gapped environments.
Encryption: Another key requirement was the ability to encrypt all data communication between the Spinnaker services and between Spinnaker and integrated tools, offered by OES.
Authorization and authentication: OpsMx Enterprise for Spinnaker supports LDAP and Active Directory (AD), fully integrating with the bank’s standards for authorization and authentication.
Simplifying the Software Delivery Process
The bank quickly completed the secure implementation and deployed pipelines for services. The bank is now able to deploy updates on-demand rather than grouping them together in a “big-bang” release that forces application downtime. The new CD process enabled by OpsMx made the process of requesting downtime unnecessary. Deployments are made into OpenShift with the help of templates available for developers.
OpsMx Enterprise for Spinnaker now controls the overall software delivery pipeline. The application team at the bank uses Bitbucket to commit the new piece of code, then OES triggers Jenkins to initiate the build.
After a successful build, the package is pushed into an external repository – either Jfrog Artifactory or BitBucket. . OES fetches these images and deploys them into the target environment. This provides an end-to-end continuous delivery system without the use of scripts.
Self Service Onboarding
Development teams, such as the team responsible for the Retail Banking applications, are able to create and manage their own pipelines using OES. This reduces demand on the central team and speeds the creation and enhancements of new services.
Results: Software Delivery Automated with Zero- downtime
Code to Production in Hours
Since the deployment of OES, the retail application development team has seen significant improvements in software delivery velocity. The code flow time has been reduced from days to few hours. OES seamlessly integrated with their existing Build and cloud environment avoid rework cost and time.
Automated Software Delivery for Global Operations
From a Traditional Software delivery process the bank was able to move towards a modern Continuous Delivery framework. OpsMx enabled a total of 120 different pipelines to serve twenty two different countries. In addition a standard template for each country was also set up that allowed the developers to quickly set up further pipelines with ease. These templates ensured that the initialization errors were reduced to nil.
0 notes
Text
Kubernetes 1.16 released
Finally it’s the weekend. Peace and quiet to indulge yourself in a new Kubernetes release! Many others have beat me to it, great overviews are available from various sources.
The most exciting thing for me in Kubernetes 1.16 is the graduation of many alpha CSI features to beta. This is removes the friction of tinkering with the feature gates on either the kubelet or API server which is pet peeve of mine and makes me moan out loud when I found out something doesn't work because of it.
TL;DR
All these features have already been demonstrated with the HPE CSI Driver for Kubernetes, it starts about 7 minutes in, I’ve fast forwarded it for you.
At the Helm
Let’s showcase these graduated features with the newly released HPE CSI Driver for Kubernetes. Be warned, issues ahead. Helm is not quite there yet on Kubernetes 1.16, a fix to deploy Tiller on your cluster is available here. Next issue up is that the HPE CSI Driver Helm chart is not yet compatible with Kubernetes 1.16. I’m graciously and temporarily hosting a copy on my GitHub account.
Create a values.yaml file:
backend: 192.168.1.10 # This is your Nimble array username: admin password: admin servicePort: "8080" serviceName: nimble-csp-svc fsType: xfs accessProtocol: "iscsi" storageClass: create: false
Helm your way on your Kubernetes 1.16 cluster:
helm repo add hpe https://drajen.github.io/co-deployments-116 helm install --name hpe-csi hpe/hpe-csi-driver --namespace kube-system -f values.yaml
In my examples repo I’ve dumped a few declarations that I used to walk through these features. When I'm referencing a YAML file name, this is where to find it.
VolumePVCDataSource
This is a very useful capability when you’re interested in creating a clone of an existing PVC in the current state. I’m surprised to see this feature mature to beta before VolumeSnapshotDataSource which has been around for much longer.
Assuming you have an existing PVC named “my-pvc”:
apiVersion: v1 kind: PersistentVolumeClaim metadata: name: my-pvc-clone spec: accessModes: - ReadWriteOnce resources: requests: storage: 32Gi dataSource: kind: PersistentVolumeClaim name: my-pvc storageClassName: my-storageclass
Let’s cuddle:
$ kubectl create -f pvc.yaml persistentvolumeclaim/my-pvc created $ kubectl create -f pvc-clone.yaml persistentvolumeclaim/my-pvc-clone created $ kubectl get pvc NAME STATUS VOLUME CAPACITY STORAGECLASS AGE my-pvc Bound pvc-ae0075... 10Gi my-storageclass 34s my-pvc-clone Bound pvc-d5eb6f... 10Gi my-storageclass 14s
On the Nimble array, we can indeed observe we have a clone of the dataSource.
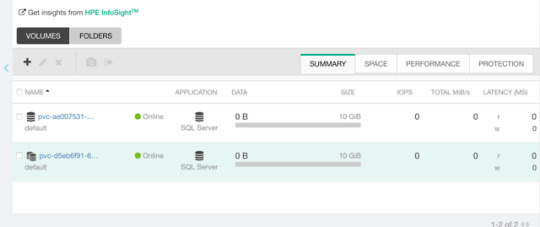
ExpandCSIVolumes and ExpandInUsePersistentVolumes
This is indeed a very welcome addition to be promoted. Among the top complaints from users. This is stupid easy to use. Simply edit or patch your existing PVC to expand your PV.
$ kubectl patch pvc/my-pvc-clone -p '{"spec": {"resources": {"requests": {"storage": "32Gi"}}}}' persistentvolumeclaim/my-pvc-clone patched $ kubectl get pv NAME CAPACITY CLAIM STORAGECLASS AGE pvc-d5eb6... 32Gi default/my-pvc-clone my-storageclass 9m25s
Yes, you can expand clones, no problem.
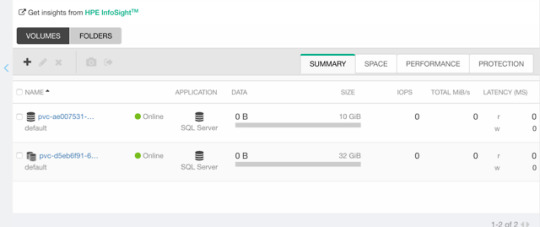
CSIInlineVolume
On of my favorite features of our legacy FlexVolume is the ability to create Inline Ephemeral Clones for CI/CD pipelines. Creating a point in time copy of a volume, do some work and/or tests on it and dispose of it. Leave no trace behind.
If this is something you’d like to walk through, there’s a few prerequisite steps here. The Helm chart does not create the CSIDriver custom resource definition (CRD). It need to be applied first:
apiVersion: storage.k8s.io/v1beta1 kind: CSIDriver metadata: name: csi.hpe.com spec: podInfoOnMount: true volumeLifecycleModes: - Persistent - Ephemeral
Next, the current behavior (subject to change) is that you need a secret for the CSI driver in the namespace you’re deploying to. This is a oneliner to copy from “kube-system” to your current namespace.
$ kubectl get -nkube-system secret/nimble-secret -o yaml | \ sed -e 's/namespace: kube-system//' | \ kubectl create -f-
Now, assuming we have deployed a MariaDB and have that running elsewhere. This example clones the actual Nimble volume. In essence, the volume may reside on a different Kubernetes cluster or hosted on a bare-metal server or virtual machine.
For clarity, the Deployment I’m cloning this volume from is using a secret, I’m using that same secret hosted in dep.yaml.
apiVersion: v1 kind: Pod metadata: name: mariadb-ephemeral spec: spec: containers: - image: mariadb:latest name: mariadb env: - name: MYSQL_ROOT_PASSWORD valueFrom: secretKeyRef: name: mariadb key: password ports: - containerPort: 3306 name: mariadb volumeMounts: - name: mariadb-persistent-storage mountPath: /var/lib/mysql volumes: - name: mariadb-persistent-storage csi: driver: csi.hpe.com nodePublishSecretRef: name: nimble-secret volumeAttributes: cloneOf: pvc-ae007531-e315-4b81-b708-99778fa1ba87
The magic sauce here is of course the .volumes.csi stanza where you specify the driver and your volumeAttributes. Any Nimble StorageClass parameter is supported in volumeAttributes.
Once, cuddled, you can observe the volume on the Nimble array.
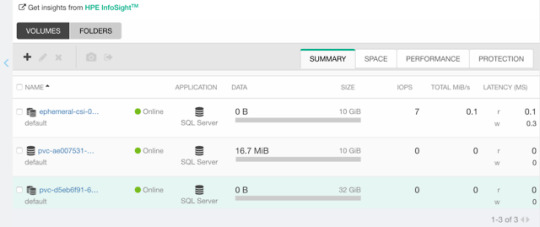
CSIBlockVolume
I’ve visited this feature before in my Frankenstein post where I cobbled together a corosync and pacemaker cluster running as a workload on Kubernetes backed by a ReadWriteMany block device.
A tad bit more mellow example is the same example we used for the OpenShift demos in the CSI driver beta video (fast forwarded).
Creating a block volume is very simple (if the driver supports it). By default volumes are created with the attribue volumeMode: Filesystem. Simply switch this to Block:
apiVersion: v1 kind: PersistentVolumeClaim metadata: name: my-pvc-block spec: accessModes: - ReadWriteOnce resources: requests: storage: 32Gi volumeMode: Block storageClassName: my-storageclass
Once cuddled, you may reference the PVC as any other PVC, but pay attention to the .spec.containers stanza:
apiVersion: v1 kind: Pod metadata: name: my-pod spec: containers: - name: ioping image: hpestorage/ioping command: [ "ioping" ] args: [ "/dev/xvda" ] volumeDevices: - name: data devicePath: /dev/xvda volumes: - name: data persistentVolumeClaim: claimName: my-pvc-block
Normally you would specify volumeMounts and mountPath for a PVC created with volumeMode: Filesystem.
Running this particular Pod using ioping would indeed indicate that we connected a block device:
kubectl logs my-pod -f 4 KiB <<< /dev/xvda (block device 32 GiB): request=1 time=3.71 ms (warmup) 4 KiB <<< /dev/xvda (block device 32 GiB): request=2 time=1.73 ms 4 KiB <<< /dev/xvda (block device 32 GiB): request=3 time=1.32 ms 4 KiB <<< /dev/xvda (block device 32 GiB): request=4 time=1.06 ms ^C
For competitors who landed on this blog in awe looking for Nimble weaknesses, the response time you see above is a Nimble Virtual Array running on my five year old laptop.
So, that was “it” for our graduated storage features! I'm looking forward to Kubernetes 1.17 already.
Release mascot!
I’m a sucker for logos and mascots. Congrats to the Kubernetes 1.16 release team.
0 notes